Repairing a Slip
Erasing an engraved line can be tough, to say the least! For a small slip, a burnisher will do
wonders. If the mistake is made before starting the shading process, it can be burnished and then block sanded going back in grits no further than necessary to
clean up the scratch. Then the original finish will need to be brought back by going through the grits until the original finish is reached. If shading has already
been started when the slip is made, first burnish and then work with a tiny piece of sandpaper on the end of a toothpick to try to blend in and over to match the
original finish. Lapping compound also works. Another possibility is to incorporate the slip into the shading so it is not noticed. If you need to fix a blunder
that is near a cut out background, sharpen a graver or point such as a needle, and use it to push under the edge of the background. Push or hammer this point into
the side at a 45 degree or lower angle. This will lift the metal, and displace it to where the slip is located. Raise it up just high enough that the slip can be
cleaned up with block sanding. This usually works well, and only leaves a hole in the edge of the background. Since it gets covered with black ink or paint, it is
not noticed.
Attaining contrast when engraving on bright finishes
Bead blasting using glass beads at about 15 to 25 PSI will increase contrast. Pressure
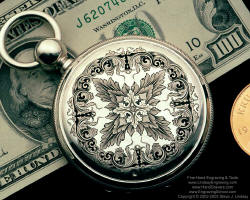
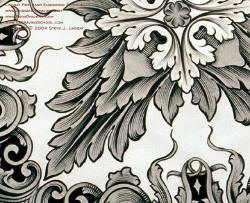
depends on how much texture or matting is desired. The contrast between the bead blasted area and the area left bright can be seen on this watch engraving.
Click to enlarge
 |
 |
The background and part of the center leaves are not bead blasted; the rest of the scroll is.
Glass beads will only peen the surface, leaving fine “dents,” or a frosted look. They will not
remove material as sand does. Sand has sharp corners, and will cut away at the metal. A word of caution: if the air pressure is increased drastically when bead
blasting, the glass beads can break. This will cause the beads to act more like sand.
Scotch tape is a good material to use for masking off areas that need to be left bright. After the
outlines are cut, lay scotch tape over the engraving, and using an exacto knife under the scope, carefully cut over the needed outlines and pull up the pieces of
tape with a sharp pair of tweezers. After the mask is ready, tape off the rest of the piece. Remove the tape carefully after bead blasting. Some glass beads may
remain on the piece that could scratch the metal. Excess beads may be removed by blowing the piece with an air hose, or holding it under running water if moisture
will not harm the piece.
Advertising and finding work
The best
way to find jobs and customers is to attend trade shows. Magazine articles
and pictures are probably the second best way. As a piece is finished,
take good photos of it, have the negatives or slides turned into 4x5
transparencies, and submit them to magazines with a short description. 4x5
transparencies are more impressive than 35mm slides or prints to a
magazine editor.
Submitting photos to magazines
If the
engraving and the photo are both good, there is a good chance that a
magazine will publish your engraving photos. Magazines are looking for
nice images to use. Sometimes submissions may not be used immediately, but
will be later. A well written description will make the photo more
valuable. Continue sending images of completed projects, and the magazine
may begin a file on your work. Persistence will remind the editors of a
developing artist, and when the right time comes, they will have a lot to
work with.